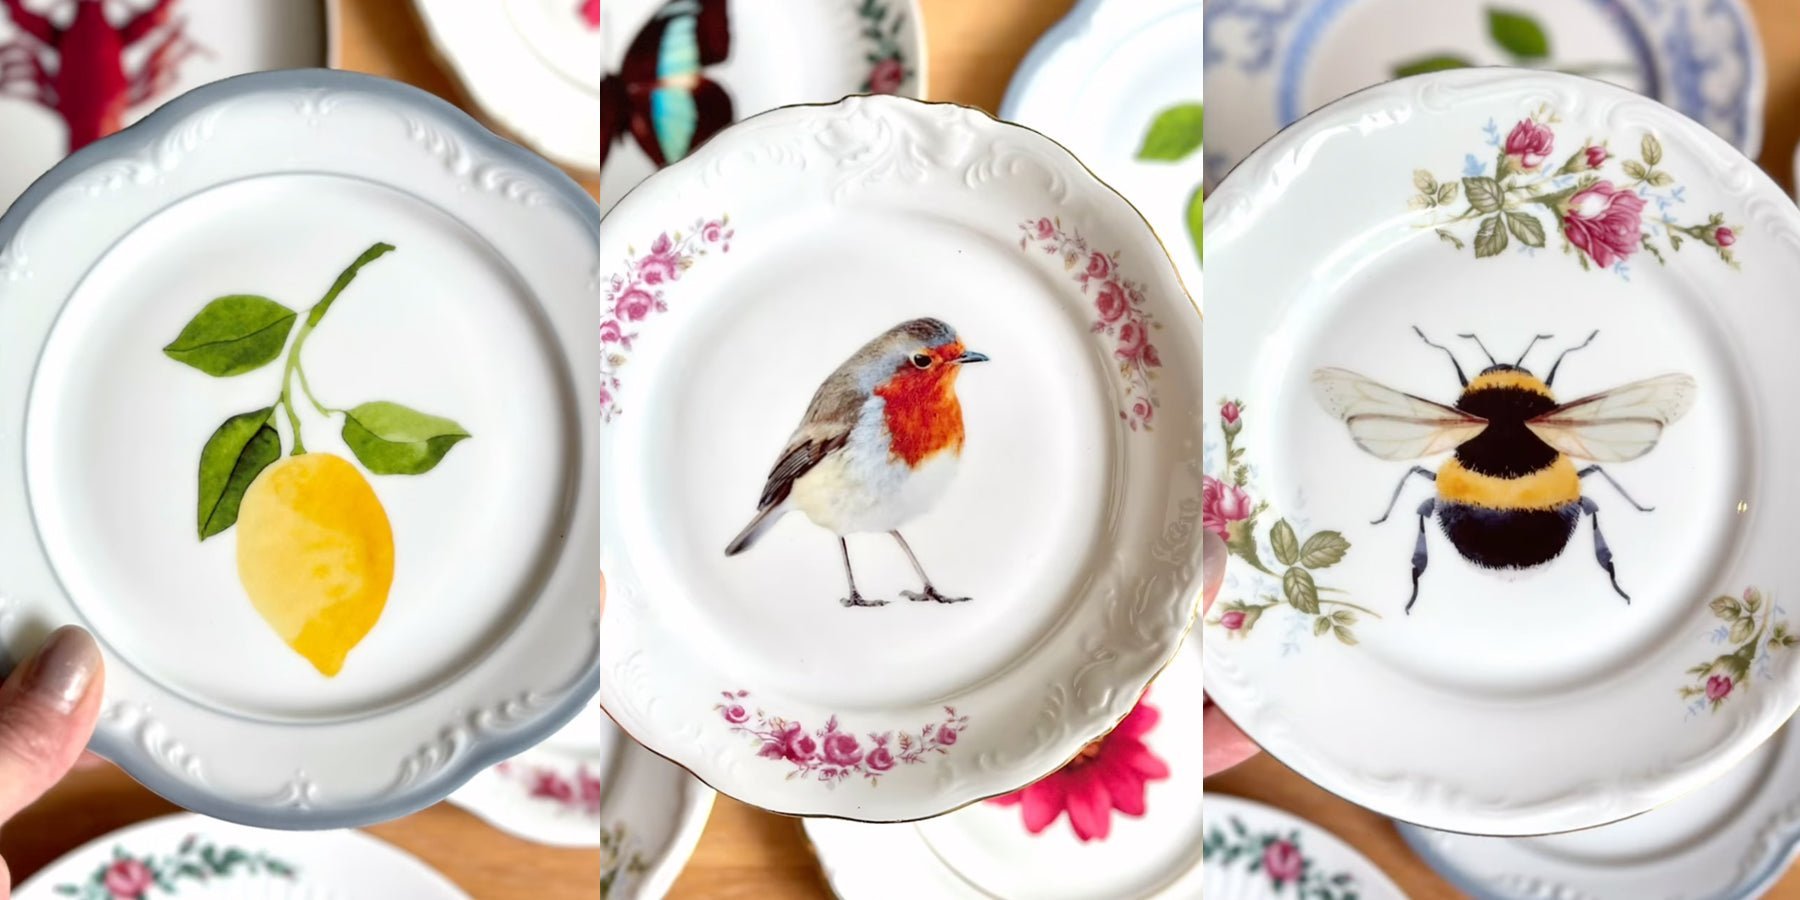
Vintage plates with gold edges, a fluffy bumblebee, sweet robin or cheerful yellow lemon on it... You may have seen them before: the stylish wall plates from Zussenatelier . If you're lucky, you can score one every now and then via their Instagram account. But you have to be quick, because they're selling like hot cakes. Good news: you can make this yourself too! With a little patience and some handy materials, you can make your own vintage mini-masterpiece for the wall in an afternoon. Read on for Zussenatelier's method and a very handy free download!
Making your own wall plaque is not only fun and relaxing, it is also a sustainable way of decorating. You give thrift store finds a second life and make something that is completely yours. Think of a butterfly on your favorite flower plate, a lobster with a gold edge or a lemon on an angular 80s bowl - everything is possible.

This is what you need for your own DIY wall sign
You may already have a lot of supplies at home to get started, but here is a handy list of material suggestions:
- Vintage plates from the thrift store
- Clear waterslide decal paper
- Nice pictures, like the printable below ⬇️
- Inkjet printer (e.g. Epson)
- Clear high gloss acrylic lacquer spray
- Gold Deco Spray (optional for gold plate edges)
- Alcohol or nail polish remover
- Lukewarm water in a bowl
- Soft dry cloth
- Painting hooks
- Oven
Download this handy DIY decal printable PDF for free below

Step by step: your own wall sign
Watch this Zussenatelier reel for the process.
Step 1: Gather your treasures
Dive into a thrift store and hunt for pretty plates. Romantic with flowers, stark white or with a classic gold edge - choose what makes you happy.
Step 2: Print your picture
Download the decal printable PDF above for the images or design your own image. Print this with an inkjet printer on the waterslide decal paper. Let the print dry well and then spray a layer of clear varnish gloss over it. Let this dry well too (about 30 minutes).
Step 3: Cut, soak and slide
Cut out your image (leave a small border), place it in a bowl of lukewarm water and wait for about a minute. The white sheet will now come loose by itself. Carefully pull it off the plate and slide the image onto the board.
Step 4: Rubbing and drying
While the plate is still wet, you can slide it until it is perfectly positioned. Use a soft cloth to gently rub away any air bubbles or wrinkles. Then let the plate dry for 4 hours.
Step 5: Fixing in the oven
Place the plate in a preheated oven at 110 degrees for 15 minutes to fix it. 🚨 Please note : the decoration is not dishwasher safe, so for decoration only!
Step 6: Hang it up!
Attach a picture hook to the back of the sign. Done? Hang your artwork in a nice spot and enjoy your homemade eye-catcher!

Also read 👉 Twins with a mission: Zussenatelier shares thrift store happiness
Prefer ready-made?
No time or desire to craft yourself? No problem! Zussenatelier occasionally offers a series of unique wall plates for sale via Instagram . These are lovingly composed, provided with their recognizable style and ready to hang on your wall. Perfect as a gift or just nice for yourself. So keep a close eye on their shop or socials!
Inspiration from Zussenatelier
Zussenatelier shows with their own creations how beautiful reuse can be. They combine vintage plates with modern images, finish with subtle gold details and turn each plate into a work of art. The result? Original eye-catchers that put a smile on your face. Do you want to see more of their work or order a ready-made wall plate yourself? Then definitely take a look at Zussenatelier on Happlify.


Interesting? Share with someone:
Beach ready: top 5 must-have fashion accessories for your sunny summer day
Jewelry with a story: emphasize your friendship with a lasting symbol